
Keep scrolling to learn how to DIY this stunning macramé peace sign for your home!


Photo Credit: The Sweetest Thing Shop
Something New
It's been four years of macramé-mania with no end in sight! Since then I've taught classes, been featured in art exhibits, and sold tons of fiber art pieces. I'm always on the hunt for accessible designs to teach on my website.
A fellow artist named Angela, who owns Frayed & Found, handcrafts macramé home décor and sells stunning vintage pieces. Check out her page on Instagram: @frayedandfound. She recently shared an amazing macramé project that I fell in love with! Immediately realizing how wonderful it would be to share the process as a fun DIY blog. Follow along with the pictures and let us know if you have any questions below! I've also provided alternative instructions to make it in black!
What is Macramé?
Macramé is a textile made with knotting (rather than weaving or knitting) techniques. It was long crafted by sailors, especially in elaborate or ornamental knotting forms. They used it for practical reasons as well as a creative outlet.
We will review some cornerstone macramé knots needed to create this project including: Lark Head's Knot, Double Half Hitch Knots, and a Square Reef Knot.
What You'll Need
Here is a list of all the things you'll need for this DIY project!
(1) Scissors
(1) Natural Cotton Macramé Rope
(1) Bag of Wooden Beads (25 mm with widened hole)
(1) Wooden Embroidery Hoop (7" width)
(1) Tape Measure
(1) Bobby Pin or Plastic Embroidery Needle
(2) S-Hooks
(1) A sprinkle of patience! LOL
OPTIONAL ALTERNATE COLOR SUPPLIES
(1) Acrylic Black Paint
(1) Paint Brush
(1) Disposable Paper Plate
(1) Black Cotton Macramé Rope
(1) Blow Dryer/Heat Gun


Photo Credit: The Sweetest Thing Shop
Ready to Get Knotty?
Read the knot terminology to execute the knots you'll use to make this wall hanging. Try practicing with some pieces of rope if you've never done this. YouTube is a great resource for visual learners. If you're a macramé pro then scroll down to the 'Instructions' section!
Lark Head's Knot/Reverse Lark Head's Knot
Lark Head's Knot is how we "cast" on or begin. Simply take your cord and fold it in half so the ends meet. Lay the loop over your dowel/ring and pull the ends through. If the pattern calls for a reverse lark head's knot, do the same technique but in the opposite
direction.
Square Reef Knot
Often used at sea for securing sails and parcels. The reef knot or square knot consists of two half knots, one left and one right, one being tied on top of the other, and either being tied first. Simply fold two strands in half. Lay the loops on top of each other. Pull the ends above on the right and below on the left. Then pull apart tight.
Double Half Hitch Knot
The Double Half Hitch Knot sounds like a mouthful, but its a great way to secure your ropes to the end of the hoop of the project. Begin by forming a clockwise loop around the hoop, with the working ends of the rope on top. Bring the working end through the loop. At this point, you have an overhand knot around the hoop. Bring the working end down and to the left. Loop it under the standing ends. Pull the working end through the loop just formed, tighten, and slide the knot along the standing end up to the post.
OPTIONAL ALTERNATE COLOR PREP:
*If you prefer to keep the design natural colored, then SKIP this part.
If you'd like to design a black version of this please see images and instructions below:
Take a disposable paper plate and place a dollop of black acrylic paint in the center.
Place 5-10 wooden beads on the plate at a time.
Gently shake plate in a circular motion and try to keep beads from falling out.
Keep slowly shaking till all beads are coated with paint.
Add 1 drop of water if paint is too thick.
Once coated let them air dry or use a blow dryer on warm to speed up the drying process.
Add another dollop of paint to the paper plate and use the the paintbrush to paint the embroidery hoop frame.
Use the blow dryer/heat gun to speed up the drying process!
Make sure all wooden components are fully dried before using!

Photo Credit: The Sweetest Thing Shop


Photo Credit: The Sweetest Thing Shop
Instructions
PRE-CUT:
(1) 80" Rope Piece (Center Line of Peace Sign)
(2) 70" Rope Pieces (Side Lines of Peace Sign)
(12) 72" Rope Pieces (Bottom Fringe)
Take (1) 80" rope piece, bend in half, and string a reverse lark head's knot at the top of the embroidery hoop. This is the start of the center line of your peace sign. See photos below to guide you.


Photo Credit: The Sweetest Thing Shop
Once secured take the bobby pin or embroidery needle and insert the ends of the now 40" long tails.
String (6) wooden beads on and push to the top of the rope. (If you have a different size hoop, fill half way down with beads to the center point of the hoop)


Photo Credit: The Sweetest Thing Shop
Add (6) more beads and get ready to secure the tail ends!


Photo Credit: The Sweetest Thing Shop
Secure the tail ends by stringing a Double Half Hitch Knot around the bottom of the embroidery hoop. Pull taut but not too tightly! See the images below to help guide you! Remember that YouTube is a great resource to look up videos of knots you have trouble with. You can replay as many times as you need till you learn.


Photo Credit: The Sweetest Thing Shop
Take the (2) 70" ropes and bend in half. Place them half way down the center line. Place one on top and one below the center line. These are the two side lines of the peace sign.
Proceed to tie a Square Reef Knot like the images below show.
Pull taut but not too tight. Use the bobby pin or embroidery needle to string on (6) more beads on each side.
Finish by repeating the Double Half Hitch Knot on the sides of the embroidery hoop. Try to angle downward to create the peace sign shape!

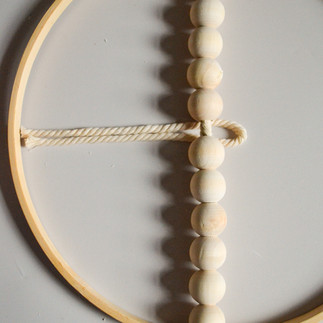


Photo Credit: The Sweetest Thing Shop


Photo Credit: The Sweetest Thing Shop


Photo Credit: The Sweetest Thing Shop
Take the remaining (12) 72" pieces and bend in half. String them along the bottom of the embroidery hoop in Reverse Larks Head's Knots. This will create the fringe!
Hang the entire piece from the ceiling on an S hook.
Eye and trim the fringe straight or pointed!


Photo Credit: The Sweetest Thing Shop
You are all done! Marvel at your accomplishments!
Find a beautiful wall or window frame to hang your amazing macramé wall hanging!

Photo Credit: The Sweetest Thing Shop

Photo Credit: The Sweetest Thing Shop


Photo Credit: The Sweetest Thing Shop
Take a Macramé Workshop with Us!
We teach a series of workshops hosted by the BEAD + FIBER store in Boston, MA. With over 14 years of design experience you'll be sure to learn something new from us! BEAD + FIBER is a women-owned and run company that serves the artists and makers of the Boston community by working with local makers and designers.
Check our 'EVENTS' page for upcoming macramé classes now!
Love Reading?
Interested in learning more macramé? Consider picking up some books about it. Here is our favorite pick: 'Macramé at Home' by Natalie Ranae. Bestselling book full of clear step-by-step images, projects, and ideas!

Photo Credit: Natalie Ranae: $12.39
Hope You Enjoyed This!
Subscribe to our website's newsletter for the latest blogs about lifestyle, fashion, and décor trends! Email us with any other questions or thoughts!
Stay In Touch & Follow Us!
Instagram: sweetestthingshop
Website: www.thesweetesthingshop.com
Comments